Tuesday, July 16, 2013

XSLTListview VS DataFormWebpart

Applies to SharePoint 2013

XSLTListview webpart was release with SharePoint 2010 to replace the Listview webpart which was used to display the list data in SharePoint 2007. It uses XSL and users can customize a lot of the XSLT and modify the look feel functionality which the LIisview webpart could not do. XSLTListview webpart works with lists and library but not with external lists.


Dataform webpart has always been around and is used to display data from list, library and external data sources as well.

Both dataform webpart and XSLT list view webpart can be customizable using XSLT for all sorts of things including Conditional formatting, sorting, filtering, grouping etc. SharePoint Designer is smart to user the right one depending on what you need it for and this is totally transparent to the user. When inserting a dataview in the page from Designer by selecting Dataview\ name of the list in the Ribbon, XSLT LIstview webpart is used whereas when Dataview\ Empty Dataview is selected from the ribbon in the designer, DataForm Webpart is used.


Check out my below posts on DataView Webpart, leave me a comment if you find them useful  

Using Dataview Webpart with SharePoint 2013
Difference between XsltListview webpart VS DataFormwebpart
Filtering XSLT List view web part with Text filter Web parts

Filtering XSLT List view webpart with Multiple SharePoint List filter webparts

Using Apply Filter Button webpart with multiple Filter webparts
Clearing filter selection on a DataView created by Filter Webparts

Clearing filter selection on a DataView created by Filter Webparts

Applies to SharePoint 2013

After using filter webparts with a dataview you will soon realize that if you want to clear the filter so that you can see all the records in the dataview it just does not work, i.e. you have to select all the filters all the time. There is not way to remove filter from one of the filters while applying filter on another one. With that being said I would also like to mention that this problem is with Empty Dataview webpart ( which is using data form webaprt ) only and not with the Dataview webpart from a list (which is making use of XSLTListview webpart )

Below is high level of what it takes to get it done and the rest of the post describes in detail :

· Create a row in the list with the value (Show All) in the column on which you want to apply filter , in my case this dummy row will contain (show All) for both first name and last name. This is key to the mechanism.

· Use XSLT Filtering instead of regular filter and do XPATH filtering. the problem with this approach is the filter is not applied in a CAML query but on the XML data after it retrieves all the data from the list which mean for larger lists it can be a performance issue. Below is code that I will be using in the advanced filtering window.

[

(

((@Title =$Param_Lastname or $Param_Lastname ='(Show All)') and @Title !='(Show All)') and

((@FirstName = $Param_FirstName or $Param_FirstName ='(Show All)') and @FirstName != '(Show All)')

)

]

Follow the above post to create a page with 2 list filter webparts, 1 apply filter button, 1 dataview and set the filtering based on parameter.

Create a row in the list with first name and last name value = (Show All). Now looking at the SharePoint list filter pop up page, it will show “(Show All)” as the first value. Users will select this to remove filter from that filter webpart.

image

Below I am deleting that filter that I created in my last post, if you don’t have it don’t bother deleting it.

image

click on the “Add XSLT Filtering “ to open the window

image

Add the following code in it, each line for

[

(

((@Title =$Param_Lastname or $Param_Lastname ='(Show All)') and @Title !='(Show All)') and

((@FirstName = $Param_FirstName or $Param_FirstName ='(Show All)') and @FirstName != '(Show All)')

)

]

The above code is just to either show the selected filter row OR if user has selected (show All) then show everything except for the (Show All) record. Looking deeper you will see one line of code for one filter webpart, so if you have more then add the same condition to every filter webpart.

Hit on Save, run the page and you will see that it lets you clear the filter on 1 filter webpart while the filter is applied on only the other. To run my test this is what I am filtering on step by step

Test 1 : First Name = Muzammil, Last Name = Mohammed

This will show the below 1 record

image

Now to see all people with Mohammed as the last name, remove the filter on First name by select (Show All) on the first name like below , hit on apply filter and Vola! All Mohammeds

image


Check out my below posts on DataView Webpart, leave me a comment if you find them useful  

Using Dataview Webpart with SharePoint 2013
Difference between XsltListview webpart VS DataFormwebpart
Filtering XSLT List view web part with Text filter Web parts

Filtering XSLT List view webpart with Multiple SharePoint List filter webparts

Using Apply Filter Button webpart with multiple Filter webparts
Clearing filter selection on a DataView created by Filter Webparts

Monday, July 15, 2013

Using Apply Filter Button webpart with multiple Filter webparts

Applies to SharePoint 2013

The good or bad thing about the filter webparts from the post above is that they do the filtering but instantaneously i.e as soon as I select firstname it applies the first name filter, then when I select lastname it does the last name filtering, at time this is not a good scenario specially in lists with a lot of data because it can cause the page to load real slow. And users want the filters to be applied only when they click on a button, the answer is the Apply Filter button.

ON the same page right below the list filter webparts lets add Apply Filters button.

image

The following tag is added

image

This single step just changes the behavior of the list filter webparts to now apply the filter only when this button is clicked. The Apply Filter button lightens up every time a filter selection is change.

image


Check out my below posts on DataView Webpart, leave me a comment if you find them useful  

Using Dataview Webpart with SharePoint 2013
Difference between XsltListview webpart VS DataFormwebpart
Filtering XSLT List view web part with Text filter Web parts

Filtering XSLT List view webpart with Multiple SharePoint List filter webparts

Using Apply Filter Button webpart with multiple Filter webparts
Clearing filter selection on a DataView created by Filter Webparts

Filtering XSLT List view webpart with Multiple SharePoint List filter webparts

Applies to SharePoint 2013
Here I am going to be using Empty Dataview webpart which is really DataFormWebpart.

Create a new Page in SharePoint Designer

Open in Advanced mode and attach a master page to it

image

Add the text for content holder

image

Insert a webpart zone and add 2 SharePoint List Filter webparts with in the zone.

image

Lets configure the 2 SharePoint list filter webparts to point to First Name and Last Name columns of the Contact List. This is done better in the Brower, so run the page by clicking the preview button

image

Edit the page in the browser and configure the list filter webparts like below

image

Configure the first filter to look like this

image

Configure the second Filter Webpart to point to Last name.

Now Drop an Empty DataView webpart

image

Then drop a datasource , In my case I am selecting the ContactsList as the datasource. Drop it between the datasource tags in the dataview.

image

Select the Column that you want from the DataSource Details view and insert them as Multi Item view.

image

The XSLT code is going to explode since this action adds a lot of XSLT to the page.

Now we have 2 SharePoint list filters and a dataview on the page. Let’s go ahead and connect them. Just like in the post before we are going to first create two parameters on the DataView one for First Name, another one for Last name. Then create a filter on the Dataview and pass values from these parameters to the firstname and the last name columns.

Creating parameters

image

Applying filter on these parameters

image

Connecting the 2 filter webparts to these Dataview

with the cursor on the DAtaFormWebpart tag click on the add connection and select “Get Parameter From” since we are tell dataview where to get the parameters from.
image

Lets configure the filter webpart connections to pass values to the Dataview. This can be done both in the Browser and the Designer, I prefer to do it form the designer. BUT MAKE SURE YOU REFRESH THE PAGE IN THE DESIGNER , or it will have an older copy of the code i.e code from before the filter webparts are configured. Better to close and reopen the page in designer.

Clicking on the dataform webpart tag click on the “Add Connections” button

image

image

image


Map the Filter to the parameter which will receive its value

image

Hit on next and click on Finish.

Now do the Same for the Last Name i.e connect Last Name filter to Param_LastName parameter.

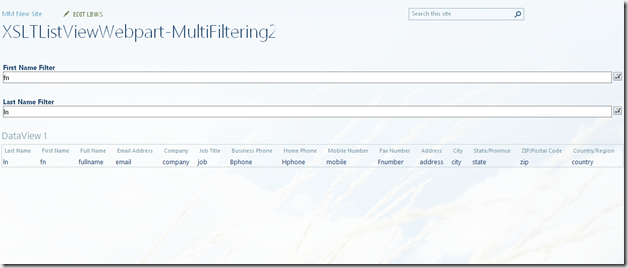
And now run the page and you will see that when you filter the first name and the last name the dataview below filters as well. And it does the filtering instantaneously.

image


Check out my below posts on DataView Webpart, leave me a comment if you find them useful  

Using Dataview Webpart with SharePoint 2013
Difference between XsltListview webpart VS DataFormwebpart
Filtering XSLT List view web part with Text filter Web parts

Filtering XSLT List view webpart with Multiple SharePoint List filter webparts

Using Apply Filter Button webpart with multiple Filter webparts
Clearing filter selection on a DataView created by Filter Webparts

Filtering XSLT List view web part with Text filter Web parts

Applies to SharePoint 2013
Out of the several different filter webparts let’s try using a Text filter webpart

On a new non-webpart page created form designer add a dataview webpart and select a list

image

Select a Text Filter webpart

image

Change the filter name and Title name to something simple

image

We are going to create a filter on Lastname, the dataview webpart will display all the contact that contain this last name. High level strategry to achive this is to create a lastname parameter in DataView webpart, apply filtering based on lastname in the XSLT listview webpart and finally pass the value of this parameter from the list filter webpart. Lets start with creating a parameter in the xsltlistview webpart ,

image

Applied filter using this parameter

image

This will add the following CAML query to the Query section, before applying the filter it was only <Query/>

image

Now lets connect xslt listview webpart with text filter. With cursor in Contact List XSLTListview webpart click on ‘Add Connection’ and in the wizard select “Get Parameters From”, this basically means we are going to get the value of a Contact List parameter, the name of the parameter will be specified later in the wizard.

image

Hit on Next

image

Hit Next, select the text filter and select the action as send value to ,

image

Hit on Next to map the parameter of ContactsList (specified in the rt side of below image) to the name of the filter which is “Last Name” also( specified in left side).

image

finally hit on next and Finish

image

This basically adds the below spwebpartconnection to the page specifying the connection between the two webparts

image

Preview the page, type in the last name filter and you will see the values refresh in the XSLTListView in the bottom.

image


Check out my below posts on DataView Webpart, leave me a comment if you find them useful  

Using Dataview Webpart with SharePoint 2013
Difference between XsltListview webpart VS DataFormwebpart
Filtering XSLT List view web part with Text filter Web parts

Filtering XSLT List view webpart with Multiple SharePoint List filter webparts

Using Apply Filter Button webpart with multiple Filter webparts
Clearing filter selection on a DataView created by Filter Webparts

Using Dataview Webpart with SharePoint 2013

Using Dataview Webpart with SharePoint 2013

Let’s go ahead and use a DataView webpart and discuss some of the basic options that it provides.

Open SharePoint Designer 2013, connect to your site and create a new non-webpart page by clicking on New ASPX page in the folder in which you want to create the page.

image

Open the page in Advanced Mode by rt. clicking on it

Save the page, this is a good practice if not a lot of ribbon buttons are disabled. Keep doing this with any mods to the pages. Dataview webpart needs a webpart zone to render, drop a Webpart zone on it in between the form tags

image

After saving the page, go to the webpart zone tag and WebPartPages:WebPartZone and add DataViewWebpart

image

Vola! This has added the dataview webpart to the page, which is basically a lot of XSLT which we will go over very soon. Preview the page in the brower by clicking on the preview button.

image


Check out my below posts on DataView Webpart, leave me a comment if you find them useful  

Using Dataview Webpart with SharePoint 2013
Difference between XsltListview webpart VS DataFormwebpart
Filtering XSLT List view web part with Text filter Web parts

Filtering XSLT List view webpart with Multiple SharePoint List filter webparts

Using Apply Filter Button webpart with multiple Filter webparts
Clearing filter selection on a DataView created by Filter Webparts